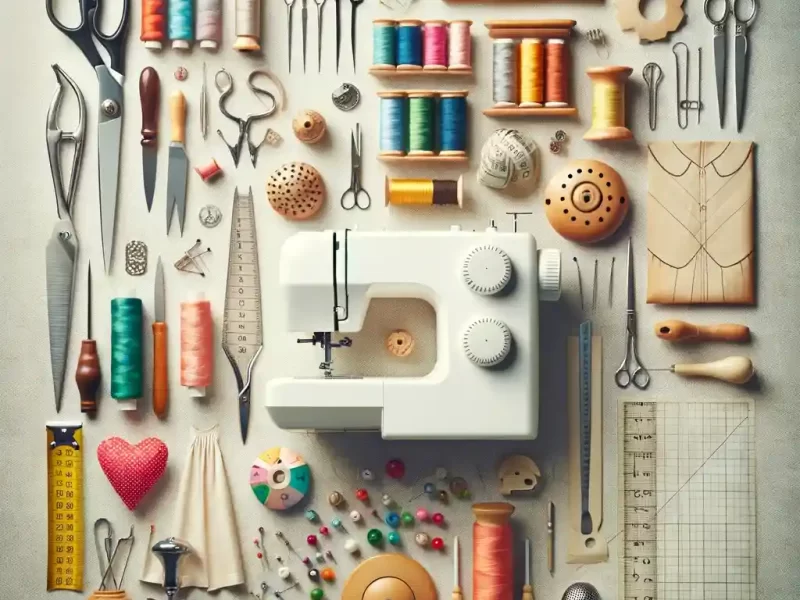
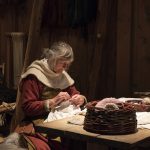
Hello, budding sewing enthusiasts and future fashion moguls! I’m thrilled you’ve landed here because today, we’re diving deep into one of my favorite sewing topics—presser feet. If you’ve been wondering how to take your sewing projects from good to absolutely fabulous, this ultimate guide is your golden ticket. Trust me, I’ve been stitching, crafting, and quilting for years, and understanding presser feet was a game-changer for me!
Whether you’re stitching up a cute scrunchie or crafting your first quilt, using the correct presser foot can make your project pop. Think of it like choosing the right paintbrush while painting; a watercolor brush can’t create the same strokes as an oil paintbrush, right? Presser feet are the secret tools that allow you to explore a vast canvas of sewing projects with precision and ease.
Brief Overview of Presser Feet and Why They Matter
Presser feet are like the “shoes” of your sewing machine—they guide your fabric and stabilize it as you sew, ensuring every stitch is perfect. But here’s the fun part: not all presser feet are made for the same “dance.” Some are fantastic for straight lines, like those you’d use for curtains. Others are like the ballet dancers of the sewing world, twirling around to create intricate embroidery. By choosing the right “shoes,” you can execute anything from a simple zig-zag stitch to an elaborate embroidery design.
Why do they matter? Imagine trying to skate on a basketball court with sneakers instead of rollerblades—you’d get stuck, wouldn’t you? In the same way, picking the wrong presser foot for your sewing task can result in a sticky situation, like uneven stitches or snagged fabric.
So, are you excited to unravel the mystery of presser feet and supercharge your sewing skills? Let’s stitch our way to mastery!
By the end of this guide, you’ll have a closet full of “shoes” for your sewing machine, and you’ll know exactly when to wear each one. Ready? Let’s dive in! 🪡✂️👗
If you’re new to the sewing game, you might be asking, “Why do I need a whole array of presser feet? Isn’t one good enough?” Ah, my friend, that’s like asking if one pair of shoes is enough for all life’s occasions. Sure, you could go to a wedding in your gym shoes, but would you want to? Exactly!
Improving Your Sewing Efficiency
First off, using the right presser foot can seriously speed up your sewing game. It’s like putting your sewing machine into turbo mode! Take the walking foot, for instance, a real MVP when you’re dealing with layers of fabric like in quilting. It helps feed the fabric evenly, so you won’t end up with a lopsided quilt. Trust me, when you’re on your 100th quilt square, you’ll be thankful for every second saved.
Enhancing Stitch Quality and Design
Next up, let’s talk stitches that could make even haute couture designers jealous. Want to add some fancy-pants (or should I say “fancy-stitch”) designs to your sewing projects? Then specialized presser feet like the embroidery foot or the darning foot are your new BFFs. These bad boys allow for free-range movement, meaning you can make intricate designs without feeling like you’re wrestling your fabric. Hello, Insta-worthy stitches!
Expanding the Range of Projects You Can Undertake
Lastly, let’s not forget the big kahuna: project versatility. Have you ever scrolled through Pinterest and thought, “I wish I could make that”? Well, gear up because with the right presser feet, your sewing world is about to get a whole lot bigger. From zipper feet for adding zippers to blind hem feet for those stealthy hems on trousers and skirts, each presser foot opens up a new realm of possible projects.
So there you have it, stitch squad. Presser feet aren’t just hunks of metal; they’re your ticket to leveling up your sewing game from newbie to “sew” fantastic. The more presser feet you know how to use, the bigger your project playground becomes.
Ready to step up your sewing game? Stay tuned, because we’re just getting to the good stuff! 🎉✂️🪡
The Anatomy of a Presser Foot: Let’s Get Up Close and Personal
Alright, stitch squad, after our deep dive into the expansive world of projects we can tackle, it’s time to zoom in and really understand the tools we’re using. Knowing your presser foot inside out is like a singer understanding their microphone—it’s essential, darling!
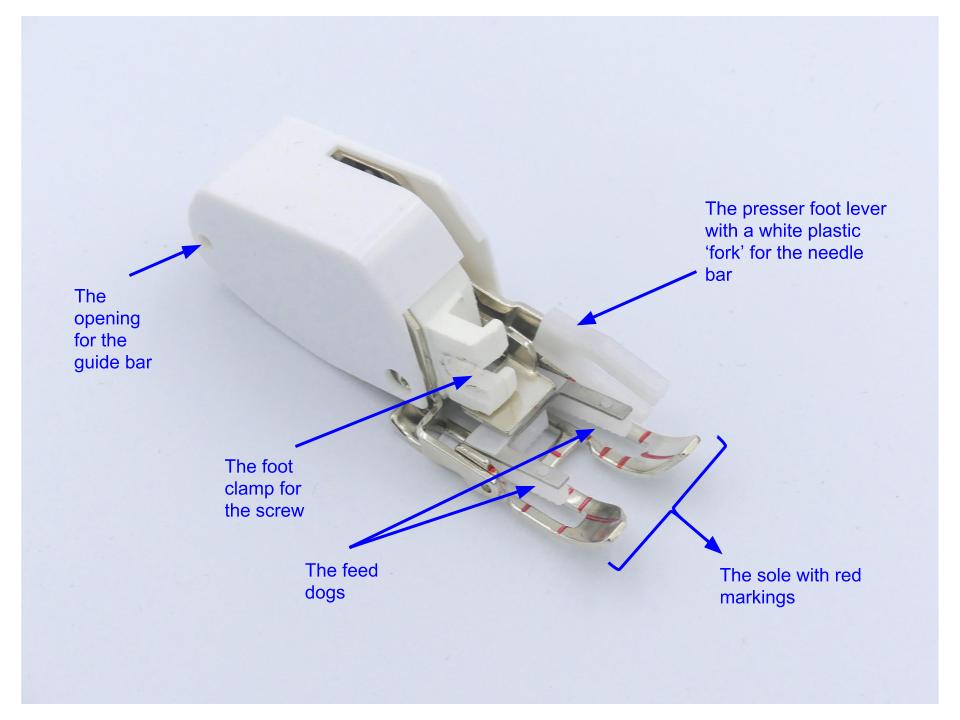
Parts and Functions
Let’s break it down, shall we? Every presser foot, no matter how fancy or basic, has a few common components:
- Shank: This is the “stem” or “leg” of the foot, and it’s how the presser foot attaches to your sewing machine. There are mainly two types of shanks: high and low. Know your shank, know your machine!
- Sole: No, we’re not talking about the bottom of your sneakers. The sole is the bottom part of the presser foot that slides over your fabric. It’s got the big job of ensuring your material stays steady while you’re sewing.
- Toe: Picture the front part of your shoe, and you’ve got the idea. The toe can be open or closed, wide or narrow, depending on the foot’s purpose. An open toe, for instance, gives you a clear view of your stitches—perfect for detailed work!
- Heel: It’s the back part of the presser foot, and it often plays a role when your sewing machine uses a lever mechanism to lift or lower the foot.
Now, why bother with all this jargon? Well, when you’re in the thick of a project and something isn’t going quite right, knowing these parts can be a lifesaver. Imagine calling customer support and telling them, “The thingy on the foot thingy isn’t working.” Not very helpful, right?
General Tips for Attaching and Detaching Presser Feet
Switching out presser feet might seem intimidating at first, but with a little practice, you’ll be swapping them out faster than changing shoes for a night out!
- Always Start Safe: First things first, always turn off your sewing machine. I can’t stress this enough! Safety is haute couture in our world.
- Raise the Presser Foot Lever: This gives you the room you need to make the switch.
- Press the Release Button: Most machines have a little button or lever behind or to the side of the foot. Give it a press or a push, and the foot should drop right off.
- Slide in the New Foot: Line up the new foot’s bar with the holder on your machine, lower the presser foot lever, and it should snap right in place. If it doesn’t, double-check to ensure you’re using the right foot for your machine’s shank type.
Voilà! You’re now armed with the knowledge to get up close and personal with your presser feet. It might seem like small beans now, but this knowledge will set the foundation for all the incredible projects you’re bound to tackle. Onward, sewing warriors! 🚀✂️🧵
Types of Presser Feet and Their Uses: Your Ultimate Footwear Guide for Sewing
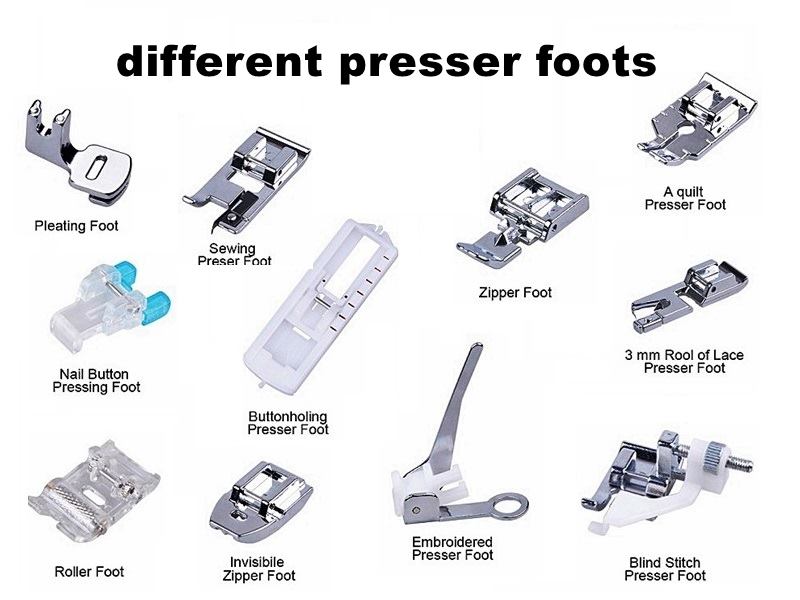
Alright, my fellow fabric aficionados, let’s dive deep into the closet of the sewing world: the presser feet collection. Remember when I said presser feet are like shoes for your sewing machine? Well, just as you wouldn’t wear flip-flops to a snowstorm, you wouldn’t use a zipper foot to sew a buttonhole. Let’s strut our way through the various types of presser feet and see which ones might just become your new go-to!
Basic Presser Feet:
1. All-Purpose Foot
- Appearance: Classic and sleek. Kinda like the “white tee” of presser feet.
- Purpose: It’s the Jack (or Jill) of all trades. Perfect for most standard sewing tasks.
- Ideal usage: Straight stitch, zigzag stitch—the basics!
- Tips: When in doubt, start with this foot. It’s the trusty fallback for any project.
2. Zipper Foot
- Appearance: Slim and asymmetrical. Like the stiletto heel, but for your sewing machine.
- Purpose: Allows you to stitch close to zipper teeth, cording, or any other “obstacles.”
- Ideal usage: Installing zippers or adding piping.
- Tips: Remember to move your needle to the left or right, depending on where you want your stitch. No snagged zippers here!
3. Buttonhole Foot
- Appearance: Longer foot with markings for different button sizes.
- Purpose: Creating precise and uniform buttonholes.
- Ideal usage: Shirts, pants, or any project with button closures.
- Tips: Always test on a scrap fabric first to ensure you get the size just right.
Specialized Presser Feet:
1. Walking Foot
- Appearance: Bulkier with an arm that attaches to the needle bar. It’s like the hiking boot of presser feet.
- Purpose: Helps in feeding multiple layers of fabric evenly.
- Ideal usage: Quilting, matching patterns or plaids.
- Tips: A must-have for thick fabrics. Makes sure everything moves in sync.
2. Darning Foot (or sometimes called Free Motion Foot)
- Appearance: Small, circular, and often transparent.
- Purpose: Allows for free movement in all directions.
- Ideal usage: Patching holes, free-motion quilting.
- Tips: Drop or cover your feed dogs before you dive in.
…And the list goes on. There’s the Blind Hem Foot for those invisible hems, the Overlock Foot for neatening up those raw edges, and the Stitch-in-the-Ditch Foot for, well, stitching in the ditch.
Advanced and Specialty Presser Feet:
1. Piping Foot
- Appearance: Has a groove underneath to accommodate piping cord.
- Purpose: Inserting piping for a polished finish.
- Ideal usage: Cushions, bags, and fashion garments.
- Tips: Ensure the piping sits snugly in the groove for an even stitch.
2. Ruffle Foot
- Appearance: A more intricate design with an adjustable screw.
- Purpose: To create consistent ruffles.
- Ideal usage: Ruffled skirts, bed skirts, or decor items.
- Tips: Play around with stitch length and tension to get varying ruffle effects.
…And let’s not forget others like the Embroidery Foot for those intricate designs or the Teflon Foot, which is like the non-stick pan of sewing—perfect for sticky materials like leather or vinyl.
So, there you have it! A whirlwind tour of the ever-expansive world of presser feet. Whether you’re a newbie or a seasoned stitcher, there’s always a new “shoe” to add to your sewing machine’s collection. Ready to step up your sewing game? Let’s foot-loose and stitch away, fashionistas! 🥿👠🪡🎉
How to Choose the Right Presser Foot for Your Project: The Perfect Pairing Guide
Stepping into the right choice of presser foot is much like selecting the perfect shoe for a grand occasion. A misstep can lead to fashion mishaps or sewing slip-ups. So, let’s ensure you always step confidently onto the sewing runway.
Matching the Foot to the Fabric
Just as you wouldn’t wear stilettos on a sandy beach, some feet aren’t made for certain fabrics.
- Light and Sheer Fabrics: A standard or all-purpose foot can sometimes be too rough on delicate fabrics. Instead, opt for a walking foot or a roller foot. They’ll treat your fabrics with the tender loving care they deserve.
- Stretchy Fabrics: The challenge? Keeping the fabric from puckering or getting stretched out. Enter the knit foot or walking foot. They’ll keep everything smooth and pucker-free.
- Thick and Heavy Fabrics: Think leather, denim, or multiple quilt layers. These tough cookies need a sturdy companion like the Teflon foot (for non-stick sewing) or the robust walking foot.
Consider the Type of Stitch You’ll Be Using
Different dances need different shoes, and different stitches need different feet!
- Straight Stitches: The all-purpose foot is your go-to buddy.
- Decorative Stitches: Looking to jazz up your project? The open toe foot gives you a clear view, ensuring those fancy stitches land in the right spot.
- Overlocking or Edging: The overlock foot not only gives a neat finish but can also prevent fabric edges from fraying.
Special Project Considerations
Last, but by no means least, let’s talk special projects.
- Quilting: The walking foot is your best pal here. But if you’re aiming for more intricate designs, consider the free-motion quilting foot.
- Embroidery: For those detailed and delicate designs, the embroidery foot ensures the needle moves freely without any fabric obstructions.
- Buttonholes: Ah, the unsung hero of many garments—the buttonhole foot ensures each buttonhole is uniform and polished-looking.
- Zippers: The narrow and adjustable zipper foot allows you to stitch close to the zipper teeth without any interference.
To wrap up this segment, remember: the right presser foot can make or break your sewing experience. By understanding each foot’s unique talents and matching them to your project’s needs, you’ll be stepping out in style, project after project. Onward, fashion-forward stitchers! 🪡✨👗👠
Common Mistakes to Avoid: Let’s Steer Clear of Those Sewing Faux Pas!
Alright, my budding seamstresses and tailors, sewing is a bit like learning to dance. Sure, you might step on a few toes (or in our case, drop a stitch or two), but with a little guidance, you can waltz through projects with grace. Here’s a little heads-up on common missteps and how to avoid them. Ready to sidestep those sewing pitfalls?
1. Using the Wrong Foot for the Fabric or Stitch
Oops Moment: It’s like wearing hiking boots to a ballroom dance. Sure, they’re both shoes, but not quite right for the occasion!
Noob-friendly Fix: Always match your presser foot to your fabric and stitch type. Remember our chat about matching feet to fabric? Stick that advice on your sewing machine if you must. And hey, if in doubt, the all-purpose foot is usually a safe bet for basics.
2. Incorrect Installation of the Presser Foot
Oops Moment: Imagine slipping into shoes two sizes too big or small. Yeah, not the best feeling, right? Incorrectly installing a presser foot can cause all sorts of stitching mishaps.
Noob-friendly Fix: First off, always make sure your machine is off—better safe than sorry! Next, ensure you’re snapping the foot in properly. If it feels wobbly or off-center, take it out and try again. Some machines even have a handy little lever or button that makes this process a breeze.
3. Neglecting Regular Maintenance
Oops Moment: It’s like wearing your favorite shoes day in and day out without ever cleaning them. Eventually, they’re going to start complaining. Your presser feet and sewing machine need some TLC too!
Noob-friendly Fix: Clean the lint and dust from your machine and presser feet regularly. A little brush usually comes with your sewing machine, perfect for this task. Occasionally, if you’re feeling extra loving, a drop of oil in the right spot can keep things running smoothly. Remember to consult your machine’s manual for maintenance tips specific to your model.
And there you have it, my fabulous fabric fanatics. A little attention to detail, a sprinkle of love for your machine, and you’ll be avoiding those common mistakes like a pro. Here’s to smooth sewing and happy dancing through our projects! 💃🎵🪡🧵🌟
FAQs About Presser Feet
Can I use presser feet from one brand on another brand’s machine?
In general, many sewing machines use a standard “low shank” size for presser feet, making them somewhat interchangeable among brands. However, not all machines and feet are standardized, especially some high-end or specialty models. It’s always a good idea to check your machine’s manual or consult the manufacturer before making a switch. When in doubt, it’s best to use the presser feet designed specifically for your machine’s brand and model.
Do I really need to invest in specialized presser feet?
It depends on the range of projects you intend to tackle. For basic sewing, the standard or all-purpose foot might be all you need. However, if you’re diving into specialized projects, like quilting, embroidery, or particular types of garment sewing, specialized feet can make the job much easier and the outcome more professional. Think of them as tools in a toolbox; the more diverse your projects, the more tools you’ll benefit from having.
How often should I replace my presser feet?
Presser feet don’t typically “wear out” in the same way that needles or other parts might. However, over time and with extensive use, they might become damaged or bent. It’s essential to inspect them periodically. If you notice any damage or if the foot isn’t holding the fabric securely, it might be time for a replacement. Otherwise, with proper care, they can last for many years.
As you continue your sewing journey, you’ll undoubtedly have more questions about presser feet and other sewing essentials. Always feel free to consult your machine’s manual, join sewing forums, or even reach out to experienced sewists in the community. Sewing is a vast world with so much to explore, and there’s always something new to learn!
Sewing it All Together: The Presser Foot Round-Up
There we have it, my sewing aficionados! We’ve embarked on quite a journey through the land of presser feet, haven’t we? From understanding their anatomy and purpose to delving deep into the vast array of types, we’ve explored the very tools that make our sewing projects come alive.
Let’s do a quick recap, shall we?
- Anatomy & Basics: We learned about the parts and functions of a presser foot, gaining insight into the mechanics of these little tools. Proper attachment and detachment, along with understanding their key features, set the foundation for our sewing projects.
- Types of Presser Feet: Oh, the variety! Whether basic like the all-purpose foot or specialized like the embroidery or Teflon foot, each presser foot has its unique role. With them, we can expand our sewing horizons and dive into projects we might’ve shied away from before.
- Choosing the Right Foot: Just like selecting the right pair of shoes for an event, picking the correct presser foot ensures our fabric dances smoothly under the needle. We discussed how to match the foot to the fabric, stitch, and even special project requirements.
- Mistakes to Sidestep: And, of course, a few pointers on what to watch out for. Using the wrong foot or neglecting maintenance might trip us up, but now, we’re ready to tackle these potential pitfalls with confidence.
Through it all, I hope you’ve found inspiration and a dash of excitement. Presser feet, as we’ve seen, can elevate our sewing game, allowing us to craft with precision, creativity, and joy. They might be small, but their impact is monumental.
Thanks for stitching along with me in this deep dive into presser feet. Here’s to many masterpieces crafted, seams sewn, and fabrics transformed. Onward, sewing warriors, to our next sewing adventure! 🪡✂️👗🌟
I love sewing, I am sewing for the last 15 years and started this blog with the help of my niece to spread sewing-related guides all over the world.
Sewing could be a full-time profession or hobby, and I wish to make a change by adding more people to the sewing world.