Hello, fellow sewing enthusiasts! I’m Amelia, and I’ve been stitching and creating for over 15 years. Today, I want to share the thrill of beginning your sewing journey, a path I embarked on with just a needle, thread, and a heart full of dreams. Imagine opening a book where every page is a new pattern, a new fabric, a new creation waiting to come alive under your fingertips. That’s what sewing is all about!
The Magic of the Right Tools ✨
When I first started, my sewing kit was modest, but oh, how each tool felt like a treasure! Just like a gardener needs a trusty set of tools to tend their garden, a budding sewer needs the right set of tools to nurture their sewing skills. It’s not just about the sewing itself; it’s about making the process smoother, more enjoyable, and yes, easier!
Realizing the Potential in Each Tool 🛠️
I still remember the joy when I discovered what a difference a good pair of fabric scissors could make, or the first time I used a seam ripper to undo a stubborn stitch. These weren’t just tools; they were my allies, helping me turn my blunders into learning moments and complex patterns into beautiful garments.
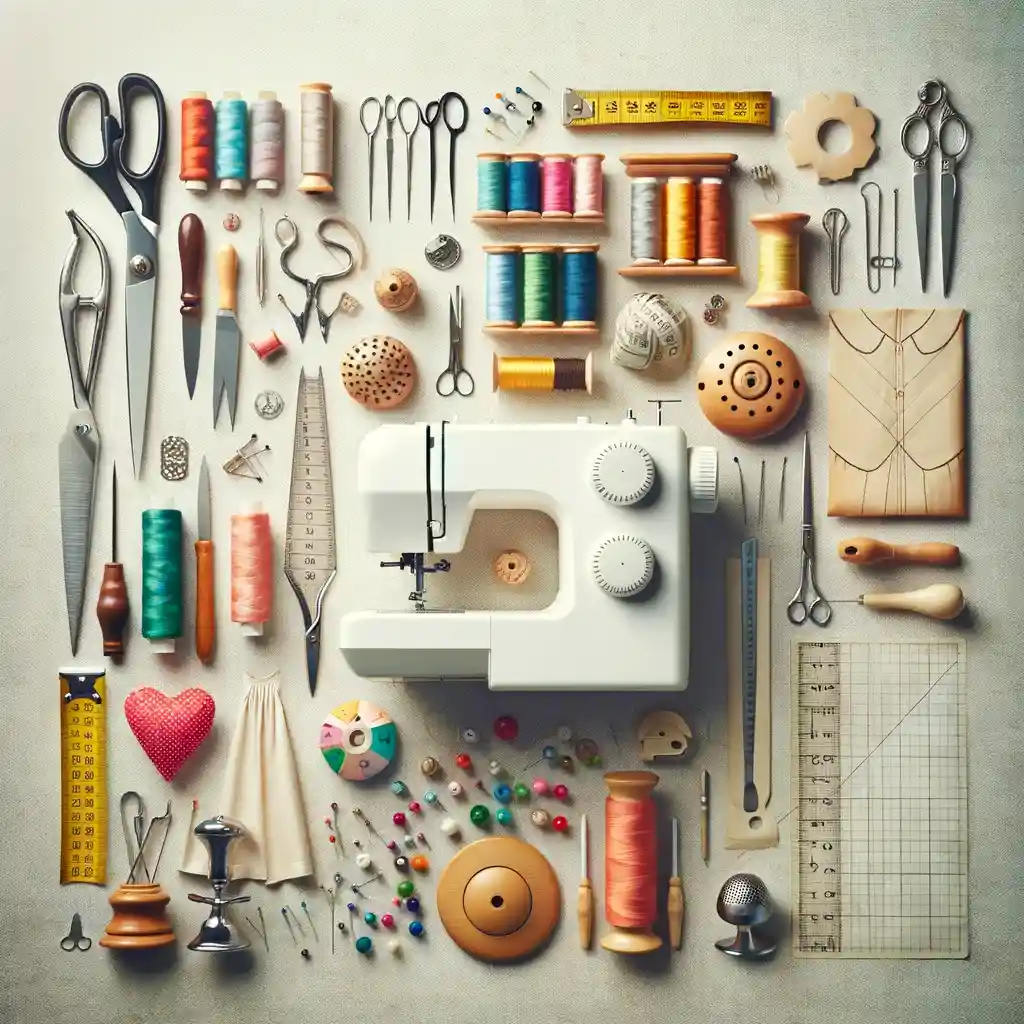
So, whether you’re taking your first steps into the world of sewing or you’re looking to refine your craft, I’m here to guide you through these essential tools. They’re the stepping stones to turning your sewing dreams into reality. Let’s embark on this journey together and unravel the 20 must-have sewing tools that every beginner should have in their arsenal. Here we go! 🪡🎉
1. Sewing Machine: Your First Step into Sewing 🪡
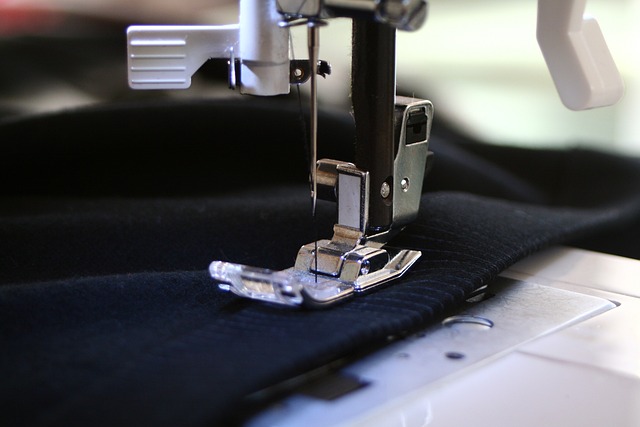
As we embark on this delightful journey of sewing, the very first gem in our toolkit is the sewing machine. Reflecting on my early days, my first sewing machine was more than a tool – it was the gateway to a world of creativity.
Choosing a Beginner-Friendly Machine
- Simplicity is Key: Look for a machine that doesn’t overwhelm you. As a beginner, a machine with straightforward functions and an easy-to-understand manual is ideal. It’s like learning to drive in a user-friendly car – you want something that helps build your confidence as you navigate new roads.
- Essential Stitch Options: A machine offering basic stitches like straight, zigzag, and maybe a few decorative stitches is perfect to start with. These options open doors to a variety of projects – from simple pillowcases to lovely garments.
- Durability Matters: Remember, your first sewing machine is an investment in your sewing journey. Opt for a machine known for its durability and reliability. It should be sturdy enough to handle your initial experiments and learning curve.
As we move from the cornerstone tool of sewing, the sewing machine, to our next essential item, keep in mind that each tool complements the other. Next up, we’ll talk about Fabric Scissors, the unsung hero of crisp cuts and flawless edges. Stay tuned to discover how this simple tool can elevate your sewing projects to the next level! ✂️🧵
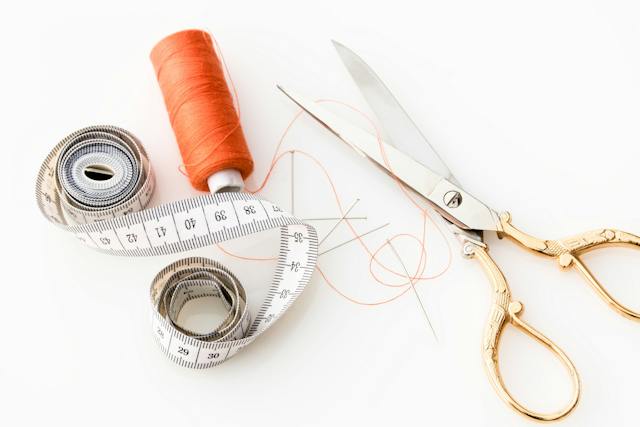
#2. Fabric Scissors: The Craftsmanship Cutter ✂️
Flowing seamlessly from the foundation of the sewing machine, we come to our next indispensable tool: Fabric Scissors. In my early sewing days, I quickly learned that not all scissors are created equal – especially when it comes to sewing.
Why Quality Matters
- Precision in Every Cut: High-quality fabric scissors make a world of difference. They provide clean, effortless cuts, ensuring your fabric’s integrity. It’s like having a fine chef’s knife in cooking – essential for precise work.
- Protecting Your Fabrics: A dedicated pair of fabric scissors is crucial. They stay sharp and effective because they’re used exclusively on fabrics, unlike regular scissors that may become dulled with varied use.
- The Right Tool for the Right Job: Just as you wouldn’t use a butter knife to chop vegetables, regular household scissors aren’t meant for fabric. Using them can lead to frayed and uneven cuts.
- Maintaining Sharpness: Fabric scissors are specifically designed to cut through different types of fabrics effortlessly. Using them on paper or other materials can dull the blades, making your sewing less efficient and more frustrating.
Read More: Sewing Machine Guide: Tips & Tricks for Beginners
As we put aside our fabric scissors, ensuring their blades remain sharp and pristine for our fabrics, we turn our attention to the next essential tool – the Seam Ripper. A humble yet significant tool, it’s every sewer’s companion in correcting those inevitable little mistakes.🪡🔍
#3.Seam Ripper: Your Trusty Error Eraser 🧵🔍
Moving from the clean cuts of fabric scissors, let’s delve into another essential tool in our sewing arsenal – the Seam Ripper. This small but mighty tool has been a loyal companion in my sewing adventures, often coming to the rescue when stitches stray off course.
Correcting Mistakes with Ease
- The Undo Button of Sewing: Just as a backspace key is vital in typing, a seam ripper is crucial for undoing stitches. Whether it’s a crooked line or an unwanted pucker, the seam ripper helps correct these errors without damaging your fabric.
- Precision and Patience: Seam ripping requires a steady hand and patience. Gently insert the sharp point under the stitch and carefully cut through the thread. It’s about finesse, not force.
Safe and Effective Use
- Handle with Care: The seam ripper’s sharp point can be a double-edged sword. Always use it with caution to avoid any accidental fabric tears or personal injury.
- Maintain and Replace: Keep your seam ripper in good condition. A dull blade can make seam ripping more challenging. Replace it when necessary to ensure it remains an effective tool in your sewing kit.
As we gently set aside our trusty seam ripper, smoothing out the fabric for a fresh start, our journey brings us to another fundamental tool – the Measuring Tape. This simple yet indispensable tool ensures accuracy from the very start of your sewing project.
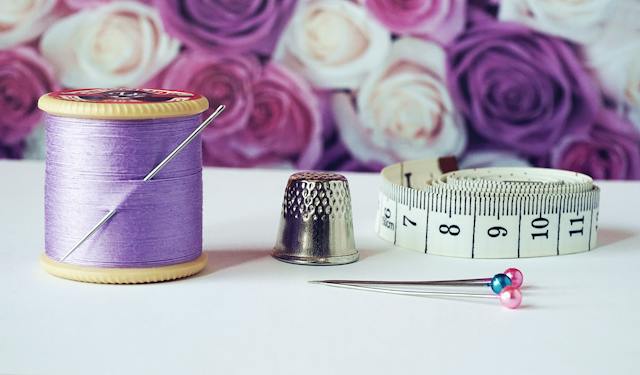
#4. Measuring Tape: The Blueprint of Your Sewing Projects 📏
As we set aside our seam ripper, an emblem of learning from our sewing mishaps, we reach for an equally essential tool in our sewing kit – the Measuring Tape. This tool has been an inseparable part of my sewing journey, ensuring every cut and stitch aligns perfectly with my creative vision.
Precision in Every Inch and Centimeter
- The Foundation of Accurate Sewing: Just as a builder needs a blueprint, a sewer needs a measuring tape. Whether you’re tailoring a custom-fit garment or cutting fabric for a new project, the measuring tape is your guide to precision.
- Flexibility for All Shapes: Unlike rigid rulers, a flexible measuring tape comfortably wraps around curves and corners. It’s perfect for taking body measurements, ensuring your creations fit just right, and for measuring fabric lengths and widths with ease.
The measuring tape, humble yet indispensable, is a testament to the saying, “Measure twice, cut once.” With it, we embark on each project with accuracy, confidence, and a foundation for success.
As we roll up our measuring tape, ready for the next task, our sewing journey takes us to our next essential tool. Stay tuned as we explore the world of Pins and Pincushions, the unsung heroes in holding our projects together, stitch by stitch. 📍🧷
#5. Tailor’s Chalk and Fabric Markers: Sketching Your Sewing Dreams 🖍️✨
Gently setting aside our measuring tape, the architect of our fabric cuts, we now turn to Tailor’s Chalk and Fabric Markers. These tools have been my faithful companions in translating ideas onto fabric, ensuring my creations take shape just as envisioned.
Bringing Patterns to Life
- A Sewer’s Pencil: Just as an artist sketches before painting, a sewer uses tailor’s chalk or fabric markers to outline patterns and adjustments directly on the fabric. It’s the first step in turning a flat piece of cloth into a three-dimensional masterpiece.
- Adjustments Made Easy: Whether it’s marking the spot for a button, adjusting a hemline, or tracing a pattern, these tools make it easy to see where to cut, stitch, or fold. It’s like having a roadmap directly on your fabric.
Tailor’s chalk and fabric markers are all about precision and planning. They allow us to make temporary marks that guide our sewing but disappear once the job is done, leaving behind nothing but perfect stitches.
As we brush away the last traces of chalk or cap our markers, we move forward to our next sewing essential. Stay tuned as we delve into the world of Straight Pins and Pincushions, tiny but mighty tools in securing our sewing projects every stitch of the way. 📌🧵
#6. Straight Pins and Pincushion: Organizing Your Sewing with Precision 📍🧵
After marking our fabrics with tailor’s chalk or fabric markers, we reach for another essential in our sewing toolkit: Straight Pins and a Pincushion. These tools have been invaluable in my years of sewing, helping to hold everything in place as the magic unfolds.
Choosing the Right Pin for the Fabric
- A Pin for Every Fabric: Not all pins are created equal. From sharp, fine pins for delicate fabrics like silk to sturdier ones for heavy materials like denim, choosing the right pin ensures your fabric is held securely without damage. It’s akin to choosing the right needle for the fabric.
- Understanding Pin Types: Ballpoint pins are perfect for knit fabrics as they slip between fibers without snagging. Flat head pins are great for general use, and longer quilter’s pins are ideal for multiple layers.
Pincushions: The Keeper of the Pins
- Organization is Key: A pincushion isn’t just a quaint sewing accessory. It’s an essential tool for keeping pins organized and at hand. Whether you prefer a traditional tomato pincushion, a magnetic one, or even a wrist pincushion, they all serve the vital role of keeping your pins safely stored and easily accessible.
- Customization and Fun: Pincushions can be a fun and creative element in your sewing space. From store-bought varieties to DIY ones, they can reflect your personal style while serving a functional purpose.
As we carefully place our last pin into the pincushion, we prepare to move on to our next sewing necessity. Up next, we’ll explore the Thread – the lifeline of sewing, weaving our creations together. Stay tuned for tips on selecting the perfect thread for your projects! 🧶💡
#7. Thread: Weaving Color and Quality into Your Projects 🧵🌈
Tucking away our straight pins into their cozy pincushion, we now turn to an element as vital to sewing as water is to life – the Thread. In my sewing escapades, I’ve learned that the right thread can be the defining factor between a project that’s just good and one that’s exceptional.
A Palette of Threads
- Color Your Creations: The variety of thread colors available is like a painter’s palette, offering endless possibilities to add vibrancy and character to your projects. Whether you’re matching the thread to your fabric or choosing a contrasting color for a bold statement, the choice of thread color can bring your creation to life.
- Types for Every Textile: From all-purpose polyester threads that work well with a variety of fabrics to sturdy cotton threads perfect for quilting, and even the delicate silk threads for fine fabrics, each type of thread serves a specific purpose.
Quality Matters
- Strength and Durability: Good quality thread won’t fray or break easily. It’s crucial to choose a thread that can withstand the tension of sewing and the wear and tear of everyday use. A weak thread can lead to frustrating sewing experiences and short-lived garments.
- Smooth Sewing Experience: High-quality thread runs smoothly through both your machine and fabric, reducing the chances of knots, tangles, or breakage. It’s about finding a thread that complements your fabric and enhances your sewing experience.
As we spool up our threads, ready to stitch our dreams into reality, let’s not forget the importance of our next essential tool – the Thimble. A tiny shield for your fingers, it’s a testament to the saying, “a stitch in time saves nine.” Stay tuned as we delve into how this small tool can make a big difference in your sewing endeavors. 📌✋
#8. Thimble: A Tiny Guardian for Your Sewing Adventures ✋🛡️
As we carefully select our threads, weaving color and strength into our projects, our attention shifts to a small yet significant ally – the Thimble. Throughout my sewing journey, this tiny protector has been a constant companion, safeguarding my fingers from those unexpected pricks and pokes.
A Shield in Miniature
- Guarding Your Fingertips: Much like a knight’s armor, a thimble is designed to protect your fingertips while hand sewing. It’s especially handy (pun intended!) when pushing needles through thick or resistant fabrics. I recall the first time I underestimated the need for a thimble – let’s just say, it was a lesson learned the hard way!
- Comfort in Every Stitch: Beyond protection, a good thimble can provide comfort during long sewing sessions. Remember, comfort is key in any craft. Just like a cozy pair of shoes on a long walk, a thimble makes the journey of sewing more enjoyable and less strenuous on your fingers.
Choosing the Right Fit
- One Size Does Not Fit All: Thimbles come in various sizes and materials – metal, rubber, and even leather. It’s important to find one that fits snugly yet comfortably on your finger. Think of it like finding Cinderella’s glass slipper; it should be just right.
- A Personal Touch: A thimble may be small, but it’s a personal tool. I’ve seen sewers who decorate their thimbles or choose unique designs that reflect their personality. It’s a lovely way to add a bit of yourself into your sewing toolkit.
As we place our thimble aside, our sewing story continues. Up next, we’ll explore Iron and Ironing Board – because as we all know, a well-pressed fabric is a seamstress’s canvas.
#8. Iron and Ironing Board: The Finishing Touch to Your Creations 🌟👗
Setting our trusty thimble aside, we now glide into another crucial stage of sewing – pressing with an Iron and Ironing Board. Throughout my sewing endeavors, I’ve learned that pressing can elevate a homemade project to a handmade masterpiece. It’s the brushstroke that completes the painting.
Pressing Towards Perfection
- A Stitch in Time, Pressed to Shine: The importance of pressing in sewing cannot be overstated. It’s not just about removing wrinkles; it’s about shaping and defining seams, hems, and pleats. It gives a crisp, professional finish to your work. There’s a certain satisfaction in seeing a once-crumpled piece of fabric transform into a smooth, ready-to-sew canvas.
- The Art of Pressing: Remember, there’s a difference between ironing and pressing. While ironing involves moving the iron back and forth over the fabric, pressing is a more gentle technique. It involves lifting and pressing the iron down onto the fabric, a method that avoids stretching or distorting your material.
Choosing a Trustworthy Iron
- Features to Look For: A good iron should have adjustable temperature settings suitable for a variety of fabrics, from delicate silks to sturdy denims. Steam options are also a plus for effective wrinkle removal and fabric shaping.
- Ergonomics Matter: Comfort is key. Look for an iron that feels right in your hand, not too heavy but with enough heft to effectively press the fabric.
As we carefully hang our freshly pressed project, we recognize the transformative power of a good iron and ironing board in sewing. They’re the unsung heroes that provide the final, polished touch. Next up, let’s explore the world of Sewing Gauge – a tool small in size but immense in its contribution to accuracy and detail in sewing. Stay tuned! 📐✨
#9. Sewing Gauge: Precision in the Palm of Your Hand 📐✨
After admiring the crispness brought by our ironing efforts, it’s time to turn our attention to a tool that’s small in stature but mighty in its utility – the Sewing Gauge. This little marvel has been a constant in my sewing kit, a testament to the fact that great things often come in small packages.
Mastering the Details
- The Unsung Hero of Accuracy: In sewing, accuracy can make or break a project. The sewing gauge is essential for those meticulous tasks – measuring hems, spacing out buttons, and marking seam allowances. It’s like having a trusty sidekick in your sewing adventures, ensuring every part of your project is aligned to perfection.
- A Multitasker’s Dream: This tool might be compact, but its versatility is vast. Whether you’re creating a perfectly turned hem or evenly spacing buttonholes, the sewing gauge offers precision that’s hard to achieve with just a ruler or a measuring tape.
Embracing the Details
- Easy to Use, Hard to Ignore: The sliding marker on a sewing gauge allows you to set and transfer measurements quickly and easily. It’s one of those ‘once used, never forgotten’ tools in your sewing arsenal.
- A Touch of Personal Efficiency: In the world of sewing, efficiency matters as much as creativity. The sewing gauge saves time and effort, making it an indispensable ally for both beginners and seasoned sewers.
As we neatly place our sewing gauge back into its spot, ready for its next mission, we prepare to delve into another crucial tool – Rotary Cutters and Cutting Mats. These tools redefine the cutting experience, bringing ease and precision to the table.
#10. Rotary Cutter and Cutting Mat: Revolutionizing Fabric Cutting ✂️🔄
Leaving the precise world of the sewing gauge, we now step into the realm of cutting with two game-changing tools: the Rotary Cutter and Cutting Mat. These have been absolute revelations in my sewing journey, especially when I ventured into the intricate world of quilting.
Effortless Precision in Cutting
- A Quilter’s Best Friend: If quilting is a symphony, then the rotary cutter is the conductor’s baton. It glides through fabric with ease, offering a level of precision and speed that traditional scissors can’t match. It’s perfect for cutting straight lines and achieving clean edges, making it a go-to tool for quilters and garment makers alike.
- Safety and Accuracy Combined: The cutting mat plays an equally vital role, protecting your work surfaces and keeping your cuts accurate. Marked with grids and measurements, it ensures every cut is aligned and precise, acting as a guide for your rotary cutter.
Choosing the Right Tools
- The Right Blade for the Right Fabric: Rotary cutters come in various sizes, and selecting the right one depends on the type of fabric and the project. A smaller blade is great for intricate cuts, while a larger one can handle multiple layers with ease.
- Protective Measures: Always retract the blade of your rotary cutter when not in use, and keep it sharp for the best results. A dull blade can lead to uneven cutting and requires more effort, which could lead to accidents.
As we cap our rotary cutter and admire the neatly cut fabrics on our cutting mat, we realize how these tools transform our sewing experience. Next up in our sewing toolkit is the Bobbin and Bobbin Case – the unsung heroes that keep our sewing machine and our projects running smoothly. 🧵🎡
#11. Bobbins and Bobbin Case: The Harmony Keepers of Sewing 🧵🎡
As we neatly stack our freshly cut fabric pieces, we turn our attention to a duo that plays a crucial role behind the scenes: Bobbins and the Bobbin Case. These components have been the heartbeat of my sewing machine, ensuring that every stitch is in harmony.
Efficient Storage and Organization
- A Place for Every Thread: Bobbins might be small, but their contribution to sewing is immense. They hold the lower thread in your sewing machine and work in tandem with the top thread to create perfect stitches. Keeping them organized is key to a smooth sewing experience. Imagine a musician keeping their scores in order; that’s how we treat our bobbins.
- Bobbin Case – The Conductor: The bobbin case holds the bobbin and provides tension to the lower thread. Properly placing the bobbin in its case is essential for even stitching. It’s like placing the last piece in a puzzle – everything falls into place beautifully.
Tips for Bobbin Bliss
- Avoid Tangles and Waste: Having a dedicated bobbin case or organizer not only keeps your bobbins in order but also prevents thread from unwinding and tangling. It’s like having a neat library of threads, ready for your next project.
- Matching and Labelling: If you work with a variety of thread types and colors, consider labeling your bobbins or using a color-coding system. This small step can save time and confusion, ensuring the right thread is always at your fingertips.
With our bobbins neatly tucked away in their case, we move forward in our sewing journey. Up next, let’s explore Scissors for Paper (Pattern Cutting) – because accurate pattern cutting is just as crucial as fabric cutting in bringing our sewing dreams to life.✂️📜
#12. Scissors for Paper (Pattern Cutting): Crafting the Blueprint of Your Creations ✂️📜
With our bobbins neatly organized and ready for action, let’s shift our focus to another crucial tool in our sewing kit: Scissors for Paper (Pattern Cutting). Just as a painter needs different brushes for different strokes, a sewer needs separate scissors for fabric and paper.
The Importance of Specialization
- Preserving the Edge: Using separate scissors for cutting paper and patterns ensures that our fabric scissors remain sharp and precise. Paper can dull the blades, making fabric cutting less efficient. It’s like having separate knives for bread and vegetables in the kitchen; each has its specific use.
- Accuracy in Every Snip: When it comes to pattern cutting, precision is key. Paper scissors offer the right sharpness and blade design to easily navigate through paper patterns, ensuring that your fabric pieces match the exact dimensions and shapes required.
Caring for Your Paper Scissors
- Regular Maintenance: Just like any other tool, keeping your paper scissors in good condition will make your sewing prep smoother. Ensure they’re always clean and sharpen them regularly.
- A Place in Your Sewing Space: Assign a special spot in your sewing area for your paper scissors to avoid mixing them up with your fabric scissors. This small step can save time and maintain the integrity of both sets of scissors
- Labeling for Clarity: Consider labeling your scissors to distinguish between the ones for fabric and those for paper. This can be especially helpful in a busy sewing environment or if you share your space with others who might not be aware of the distinction.
With our pattern pieces accurately cut and ready, we’ve set a solid foundation for our sewing projects. Next up, we’ll delve into the world of Seam Guides – a tool that ensures precision and consistency in every stitch you make.
#13. Seam Guide: Your Pathway to Uniform Seams 📏✨
After meticulously cutting our patterns, we come to a tool that plays a pivotal role in ensuring sewing accuracy – the Seam Guide. Much like a ruler guides a student in drawing a straight line, a seam guide helps us achieve consistent seam allowances, a cornerstone for professional-looking projects.
Achieving Seam Perfection
- Consistency is Key: In sewing, even a slight deviation in seam allowance can alter the fit and look of a garment. The seam guide acts as a reliable reference point, ensuring each seam is uniform. It’s the secret behind those flawlessly constructed garments we admire.
- A Variety of Forms: Seam guides come in various forms, from magnetic guides that attach to your sewing machine to adjustable guides that can be set for specific seam allowances. Some sewing machines even have seam allowance markings etched onto the throat plate. Whatever form it takes, the goal is the same – precision.
Using the Seam Guide Effectively
- Easy to Use, Hard to Overlook: For beginners, the seam guide is a fantastic learning tool, instilling good sewing habits from the start. For experienced sewers, it’s a time-saver and accuracy enhancer.
- Customizable to Your Project: Whether you’re working on a delicate silk blouse or a sturdy canvas tote, the seam guide can be adjusted to suit the specific seam allowance required for your project.
As we align our fabrics with the seam guide, ensuring each stitch is just where it needs to be, we prepare to explore our next essential sewing tool. Coming up next, we’ll delve into the importance of Magnetic Pin Holders – a tool that not only keeps your pins secure but also adds a touch of convenience to your sewing experience.📍🧲
#14. Magnetic Pin Holder: The Modern Solution for Pin Management 📍🧲
Having discussed the precision brought by the seam guide, let’s turn our attention to an innovative tool that has modernized pin storage – the Magnetic Pin Holder. This handy gadget has been a game-changer in my sewing studio, simplifying the way I handle pins.
Effortless Pin Pickup and Storage
- Magnetic Attraction: The beauty of a magnetic pin holder lies in its simplicity. Dropping pins on it secures them instantly, and picking them up is just as easy. It’s like having a little magnetic field where your pins obediently stay in place, away from fabric and, most importantly, your feet!
- A Tidy Sewing Space: Gone are the days of pins scattered across the sewing table or the floor. The magnetic pin holder keeps them neatly contained, reducing clutter and the risk of losing them. It’s akin to having a neat, organized desk – everything in its place, ready when you need it.
Enhancing Your Sewing Efficiency
- Quick Access: No more fumbling through a traditional pincushion to find a pin. With a sweep of your hand over the magnetic holder, you can pick up several pins at once, speeding up your prep time.
- Versatility and Portability: Most magnetic pin holders are compact and portable, making them perfect for taking to sewing classes or workshops. Plus, they can hold other small metal items like needles or safety pins.
As we attach the last pin to our magnetic holder, marveling at the ease and organization it brings to our sewing process, we ready ourselves for the next essential tool. Coming up, we’ll explore the world of Tracing Wheel and Tracing Paper – tools that effortlessly transfer patterns onto your fabric, ensuring your projects take shape just as you envision. Stay tuned for this next step in our sewing journey! 📜🔍
This segment highlights the convenience and efficiency of using a Magnetic Pin Holder in sewing, emphasizing its role in organizing and simplifying the handling of pins, and transitions smoothly to the introduction of the next tools, the Tracing Wheel and Tracing Paper, maintaining the cohesive narrative of essential sewing tools.
#15. Tracing Wheel and Tracing Paper: Mastering Pattern Transfer 📜🔍
After neatly securing our pins on the magnetic holder, we venture into the realm of pattern transfer, a critical step in sewing. Here, the Tracing Wheel and Tracing Paper emerge as invaluable tools, enabling us to transfer sewing patterns onto fabric with precision and ease.
Bringing Patterns to Life on Fabric
- The Dynamic Duo: The combination of a tracing wheel and tracing paper is like the pencil and paper of the sewing world.
- The tracing wheel, with its serrated edges, gently presses the pattern onto the fabric through the tracing paper, leaving a clear imprint of the design. It’s a bit like magic – watching a paper pattern transform into a roadmap on your fabric.
- Precision and Clarity: Whether you’re working on a complex garment pattern or a simple craft design, the tracing wheel ensures that every detail of the pattern is accurately mirrored onto the fabric. This precision is crucial for the fit and final look of the project.
Tips for Effective Pattern Transfer
- Gentle Pressure: Apply just enough pressure to transfer the pattern without damaging the fabric or the tracing paper. It’s a delicate dance – much like brushing a feather across a canvas. You want to leave a mark, but not too harshly.
- Choosing the Right Paper: Tracing paper comes in different colors. Choose a color that contrasts with your fabric for better visibility. It’s like choosing the right color highlighter for your notes – it should stand out, but not overpower.
- Practice Makes Perfect: If you’re new to using a tracing wheel, practice on scrap fabric first. This will give you a feel for the right amount of pressure and speed you need.
As we roll away our tracing wheel and fold up the tracing paper, we’ve set a strong foundation for our sewing project. Coming up next, let’s talk about the Iron-on Interfacing – a tool that adds structure and stability to your fabric, ensuring your creations not only look good but also last long. 📏👗
#16. Storage Solutions: Organizing Your Sewing Sanctuary 🗃️🧵
After meticulously transferring our patterns, let’s discuss a key aspect that often gets overlooked but is crucial for a streamlined sewing experience – Storage Solutions. Having organized my own sewing space over the years, I’ve come to appreciate the peace and efficiency that well-thought-out storage brings.
Keeping Your Sewing Supplies in Order
- A Place for Everything: Just as a well-organized kitchen makes cooking a pleasure, a tidy sewing space enhances your sewing experience. Options like boxes, bins, and drawer organizers not only keep your tools and materials easily accessible but also protect them from damage and loss.
- Customizable Storage Solutions: Whether it’s a compact sewing box for those who are just starting out or a set of drawer organizers for more extensive collections, the key is to choose storage solutions that fit your space and your sewing habits. It’s like building your own little sewing ecosystem – everything within reach and in its rightful place.
Tips for Effective Storage
- Labeling for Ease: Using labels can save you time and frustration. Imagine searching for that one specific thread color in a sea of spools – labels can be a lifesaver.
- Visibility and Accessibility: Clear storage containers or open bins can be very helpful. Being able to see your supplies makes choosing what you need much easier, just like having a clear view of your spices while cooking.
As we neatly stack our last spool of thread into its designated spot, we close the chapter on storage solutions. Up next, let’s explore the world of Sewing Books and Magazines – resources that inspire, educate, and keep us connected with the broader sewing community.
Conclusion: Stitching Together the Essentials for Sewing Success 🪡✨
As we wrap up our exploration of the 20 must-have sewing tools for beginners, let’s take a moment to stitch together the essence of what we’ve discovered.
Beginning with the Basics
- The Right Tools Make All the Difference: Just as a painter needs their brushes and a gardener their trowels, every sewer needs their toolkit. Starting with the right tools, from the humble needle to the dynamic sewing machine, sets the foundation for a fulfilling sewing journey. Remember, it’s not about having a lot right away, but about having the right ones to start with.
Building Your Toolkit Over Time
- Growth and Gradual Accumulation: Just like a plant grows from a seed, your sewing toolkit will expand as your skills and needs grow. There’s no need to rush – every addition to your toolkit should be a step towards enhancing your sewing experience. Embrace each new tool as you did your first spool of thread or your first pair of fabric scissors.
The Joy and Creativity of Sewing
- More Than Just Stitches: Sewing is a journey of creativity, expression, and endless learning. Each stitch is a story, each fabric a new chapter, and each completed project a milestone. Whether you’re sewing a button, crafting a garment, or quilting a masterpiece, the joy lies in the creation process as much as in the final product.
- A Community of Fellow Sewers: Remember, you’re part of a vibrant community. Each thread, needle, and fabric connects you to a long history of sewers, each with their own tales and techniques. Embrace this journey, share your experiences, and continue to inspire and be inspired.
As we conclude, I encourage you to cherish every moment of your sewing adventures, from the challenges to the triumphs. Here’s to the stitches we’ve made and the many more we’ll create. Happy sewing, everyone! 🌟🧵🎉

I love sewing, I am sewing for the last 15 years and started this blog with the help of my niece to spread sewing-related guides all over the world.
Sewing could be a full-time profession or hobby, and I wish to make a change by adding more people to the sewing world.